Sculpting directly into Porcelain by Marlaine Verhelst
Porcelain for hand sculpting has been used for centuries by ceramicists in sculpting their “objets d’arts”. It is a material for experienced sculptors. I use the German brand “Hutschenreuter” or the French brand “Limoges” and fire it only once on 1220 or 1240 degrees Celsius. After firing I paint the porcelain with watercolour and I cover this with a varnish as a protection.
The reason that I have made the choice to work in porcelain is that I like the surface and it is a funny thought that my porcelain dolls will still be there long after I am gone.
I learned the basics of sculpting into porcelain from a ceramicist. She told me to start from a ball of clay, pushing your thumbs into it until you get a hollow form. Because I seemed to give more pressure with my right thumb, all the skulls I made were a-symmetrical. I decided to start sculpting solid and then hollow the piece. I got quite frustrated because it was more work to hollow the piece than sculpting it.Then I developed my own method that I still use and that I will show you here.
To start with the head I take a styrofoam egg and put a pin in the pointed side (so I can recognize it once it has been covered). I grease the egg with salad oil and cover it with two flat slices of porcelain
Then I start modelling the chin – the side with the pin (that can be removed now). You can model the face including the ears as you are used to, keeping the head in your hands.
My order in sculpting is:
– The chin
– The forehead
Before going on now give your head a critical look from every side. Especially make sure that the skull has a good shape and that it is symmetrical
My further sculpting order is:
– The nose
– The mouth
– The eyes
– The cheeks/jawbones
– The ears
If you are working very slowly or if you do have dry and warm hands I would advise you to put a piece of plastic wrap between your hands and the head. If you don’t, the back of the head will dry, shrink and crack. If you keep the head wet then you can work on it for about two weeks. When you have finished the sculpting of the head you let it dry for one to three hours. It has to reach a certain stage between wet and dry. Then you will be able to open it to remove the egg. The egg cannot be left inside because the porcelain will shrink while drying.
To give the head a neck and shoulderplate I have developed a special stand. On top I can put plastic tubes of different lengths to fit in with the size of the head and the length of the neck. Cover the stand with plastic wrap and prepare the shoulderplate.
Now we can operate on the head. First we will make a hole for the neck by removing a round piece of material with a little knife. Then remove the top of the head – the brain pan- as you do with a boiled egg. Don’t forget to place a mark so you will know how to put it back You can push out the egg now with your thumb. Remove some of the material of the thickest parts of the head, for instance the forehead and the chin. You can use the tool shown in this article.
To replace the top of the head you have to make scratches -using a little knife- in the two parts that have to close. After scratching you will have to wet these parts with a (wet) brush and without removing the scratches. Press the top of the head on the right place (where you have marked) now. Smooth away the seam.
Put the head on the stand in the position that you prefer. Model the neck out of a slice of porcelain and smooth away the seams. Cover the head now with plastic without closing it entirely. Leave it this way for a few hours so the moisture can spread evenly.
If the entire piece feels like chocolate (as the head before operating) you can remove it from the stand and work on the inside of the head if necessary.
Let it dry slowly before firing. The material will shrink twice: the first time during the drying process and the second time during firing. In the picture you can see a freshly sculpted head together with a fired head.
Good luck!!
~Marlaine Verhelst
This method of sculpting directly in porcelain has been developed by myself and described in my earlier books and on my CD (in english) “Handsculpting directly into Porcelain” with text, illustrations, pictures and a complete video demonstration of sculpting into porcelain with further details on this subject, how to paint on porcelain with watercolour and a gallery of Marlaine Verhelst dolls. I have conducted workshops on this subject all over the world.

1. The Tools

2. the egg, covered and with chin & forehead added
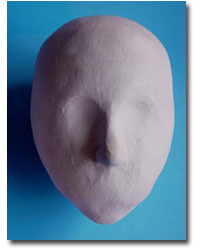
3. now to start sculpting the head

4. ready sculpted head

5. prepared stand for breastplate

6. cut off the brain pan

7. push out the egg

8. hollowing the thicker parts

9. place the brain cap back, line up marks

10. the head on the stand

11. unfired and fired head; same size
